The Slackware Linux operating system is a powerful platform for Intel-based computers. It is designed to be stable, secure, and functional as both a high-end server and powerful workstation.
This book is designed to get you started with the Slackware Linux operating system. It’s not meant to cover every single aspect of the distribution, but rather to show what it is capable of and give you a basic working knowledge of the system.
As you gain experience with Slackware Linux, we hope you find this book to be a handy reference. We also hope you’ll lend it to all of your friends when they come asking about that cool Slackware Linux operating system you’re running.
While this book may not an edge-of-your-seat novel, we certainly tried to make it as entertaining as possible. With any luck, we’ll get a movie deal. Of course, we also hope you are able to learn from it and find it useful.


Custom Search
Sunday, November 30, 2008
Saturday, November 29, 2008
Sony Ericsson P1i Mobile Phone GPRS/UMTS Linux How-To
This how-to helps you use your Sony Ericsson P1i mobile phone with Linux. I have tested it with P1i, an USB cable, and the Finnish operator Indosat Mentari.
Do the following to use the phone for your network access in Linux:
1. Make sure your phone works first on its with Internet. Launch a browser, it should work with any web site and not just with WAP. This will require configuration of an Internet access profile on your phone. Typically, you get it pre-installed or you can ask for an SMS that sets it up from your operator.
2. Take the cable that came with the phone, and plug it into the phone and the USB port in your computer. This will your computer to detect the phone using USB. It comes up as a modem.
3. Configure PPP to know about a peer on the other side of that modem. Put this into your /etc/ppp/peers/gprs file:
debug debug debug
#nodetach
updetach
connect "/usr/sbin/chat -v -f /etc/chatscripts/gprs-connect"
disconnect "/usr/sbin/chat -v -f /etc/chatscripts/gprs-disconnect"
#/dev/rfcomm0
/dev/ttyACM1
460800
usepeerdns
defaultroute
persist
noipdefault
noauth
4. Create the necessary chatscripts so that PPP can start. These go into two files shown below. The hard part in the first one is selecting the right number instead of "1" in the line "OK ATD*99***1#". I put 1 there because my working Internet access profile in the phone is the first one. You may experiment with different numbers if you have a problem.
::::::::::::::
/etc/chatscripts/gprs-connect
::::::::::::::
TIMEOUT 5
ECHO ON
ABORT '\nBUSY\r'
ABORT '\nERROR\r'
ABORT '\nNO ANSWER\r'
ABORT '\nNO CARRIER\r'
ABORT '\nNO DIALTONE\r'
ABORT '\nRINGING\r\n\r\nRINGING\r'
'' \rAT
TIMEOUT 12
SAY "Press CTRL-C to close the connection at any stage!"
SAY "\ndefining PDP context...\n"
OK ATH
OK ATE1
OK ATD*99***1#
TIMEOUT 22
SAY "\nwaiting for connect...\n"
CONNECT ""
SAY "\nConnected."
SAY "\nIf the following ppp negotiations fail,\n"
SAY "try restarting the phone.\n"
::::::::::::::
/etc/chatscripts/gprs-disconnect
::::::::::::::
ABORT "BUSY"
ABORT "ERROR"
ABORT "NO DIALTONE"
SAY "\nSending break to the modem\n"
"" "\K"
"" "+++ATH"
SAY "\nPDP context detached\n"
5. Turn on PPP by typing "pppd call gprs" in your root shell window. You should see debugs showing what happened.
6. Test that it works. Note that at least for my operator, ping does not work in testing, because the operator filters ICMP. Start with a simple web page. Please make sure that you turned off other interface with ifconfig eth0 down etc before you started in Step 5 -- otherwise you'll have a problem.
I would like to thank Jari Arrkho for helping me get my GPRS connection up and running.
Sunday, November 16, 2008
Add Applications to the Startup Programs
Thanks to http://www.tech-recipes.com
By adding an application to the Startup Programs, that application will automatically run once Ubuntu has finished booting. This is quite useful for applications such as Gmail Notifier that have a small footprint but provide a useful function to the user.
1. Click System, mouseover Preferences and select Sessions.
2. Under the Startup Programs, click the Add button.
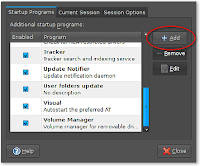
3. Input the Name and the Command that executes the desired application in the appropriate text boxes. If you aren’t sure of the command, click the Browse button and go to the executable. For example, the command you would input for the Gmail Notifier is gmail-notify.

4. Click OK.
5. Click the Close button to exit the Sessions window.
Saturday, November 15, 2008
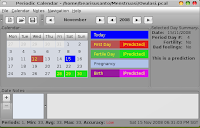
PERIODIC CALENDAR
Periodic Calendar is a GUI utility which can be used to:
* track women menstrual cycles
* calculate the fertile days when the probability to get pregnant is high
* calculate the "safe" days when the probability to get pregnant is minimal
* predict the day of the next menstruations
* record the pregnancy
* calculate the pregnancy weeks
* predict the baby's birth date
* record the personal notes for any day
At this point the fertility prediction is based on the calendar method only which is not very precise. It is not recommended to use this method alone for the natural family planing.
In the future versions it is planned to add the support for the BBT (Basal Body Temperature) method which in addition to the calendar method provides more precise predictions. However, this method requires more efforts (daily temperature measurements) while the calendar method requires only to remember the cycle start dates and enter them somehow into the program. The effectiveness of the BBT method itself is about 80-90%. Combining more than one method makes the predictions more effective.
Other self-observations methods I know are really hard to support on a computer.
THIS PROGRAM PREDICTIONS IN NO CASES SHOULD BE USED AS THE FINAL. THE METHODS USED ARE NOT 100% PRECISE FOR ALL WOMEN.
This program is free software; you can redistribute it and/or modify it under the terms of the GNU General Public License as published by the Free Software Foundation; either version 2 of the License, or (at your option) any later version.
This program is distributed in the hope that it will be useful, but WITHOUT ANY WARRANTY; without even the implied warranty of MERCHANTABILITY or FITNESS FOR A PARTICULAR PURPOSE. See the GNU General Public License for more details.
You should have received a copy of the GNU General Public License along with this program; if not, write to the Free Software Foundation, Inc., 59 Temple Place - Suite 330, Boston, MA 02111-1307, USA.

Friday, November 7, 2008
How To Upgrade Ubuntu 8.04 (Hardy Heron) To 8.10 (Intrepid Ibex)
Thanks to http://www.howtoforge.com
This guide shows how you can upgrade your Ubuntu 8.04 desktop and server installations to Ubuntu 8.10.
This document comes without warranty of any kind! I do not issue any guarantee that this will work for you!
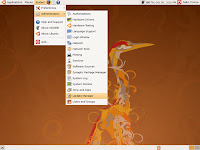
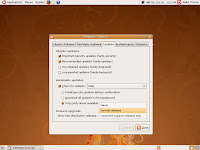
1. Go to System > Administration > Software Sources:
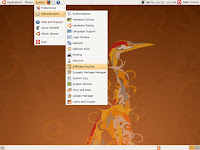
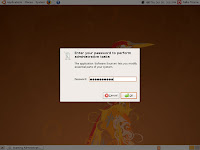
2. Type in your password:
3. In the Software Sources window, go to the Updates tab and select Normal releases in the Show new distribution releases drop-down menu; then close the Software Sources window:
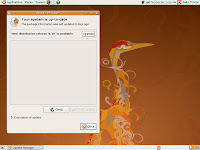
4. Now start the Update Manager (System > Administration > Update Manager):
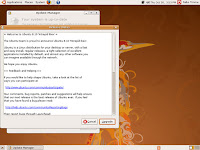
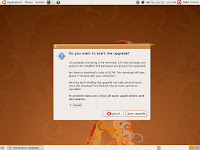
5. The Update Manager should show that a new distribution release (8.10) is available. Click on the Upgrade button to start the distribution upgrade:
6. A window with the release notes for 8.10 comes up. Click on Upgrade again:
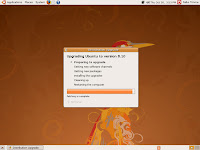
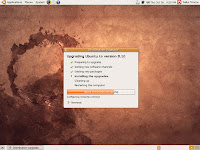
7. The upgrade is being prepared:
8. Click on Start Upgrade to finally begin with the upgrade process:
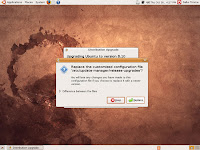
9. Replace /etc/update-manager/release-upgrades:
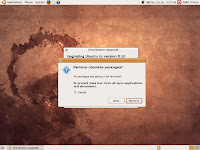
10. At the end of the upgrade process, you should remove obsolete packages:
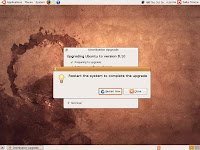
11. The system needs to be rebooted to complete the upgrade, therefore click on Restart Now:
12. After the reboot, you can use your new Ubuntu 8.10 desktop

This guide shows how you can upgrade your Ubuntu 8.04 desktop and server installations to Ubuntu 8.10.
This document comes without warranty of any kind! I do not issue any guarantee that this will work for you!
1. Go to System > Administration > Software Sources:

2. Type in your password:

3. In the Software Sources window, go to the Updates tab and select Normal releases in the Show new distribution releases drop-down menu; then close the Software Sources window:

4. Now start the Update Manager (System > Administration > Update Manager):

5. The Update Manager should show that a new distribution release (8.10) is available. Click on the Upgrade button to start the distribution upgrade:

6. A window with the release notes for 8.10 comes up. Click on Upgrade again:

7. The upgrade is being prepared:

8. Click on Start Upgrade to finally begin with the upgrade process:


9. Replace /etc/update-manager/release-upgrades:

10. At the end of the upgrade process, you should remove obsolete packages:

11. The system needs to be rebooted to complete the upgrade, therefore click on Restart Now:

12. After the reboot, you can use your new Ubuntu 8.10 desktop

Thursday, November 6, 2008
Shreading Data
Data which has been deleted maybe could be recovered with recovery software, It could be dangerous if there is an important file that somebody couldn't know the contents.
To reduce the risk, that someone could recovered our files, we can do deleting process permanently with using software utility which have permanent delete ability. In Linux platform, we have utility like SHRED and WIPE.
Here is the usage the two utility.
1.Deleting data using SHRED
I take a sample to delete USB Flashdisk (UFD) permanently.
- Use command fdisk -l to know the UFD location
root@hardy:/# fdisk -l
...
Disk /dev/sdb: 1026 MB, 1026555392 bytes
129 heads, 16 sectors/track, 971 cylinders
Units = cylinders of 2064 * 512 = 1056768 bytes
Disk identifier: 0x28eff17f
Device Boot Start End Blocks Id System
/dev/sdb1 * 1 972 1002487+ b W95 FAT32
Partition 1 has different physical/logical endings:
phys=(977, 128, 16) logical=(971, 52, 15)
- From the information in the above, we knows that UFD is located at /dev/sdb1.
Before we doing manual delete, do umount the UFD from system.
First, see the mount UFD partition location use command df -h
root@hardy:/# df -h
...
/dev/sdb1 978M 347M 631M 36% /media/BENNY
- Now, we can permanently delete our file using shred command
root@hardy:/# shred --verbose -u /dev/sdb1
...
shred: /dev/sdb1: pass 1/25 (random) ... 126MiB/3.8GiB 3%
...
- For default, command above will do overwrite iteration 25 times. If, this is too long we
could use option -n
root@hardy:/# shred --verbose -u -n 5 /dev/sdb1
- Now, all data in UFD is permanently deleted. To using UFD again, we have to format it
2.Deleting data using WIPE
Except shred, we have wipe command which the have ability like shred.
root@hardy:/# wipe -kq /dev/sdb1
Okay to WIPE 1 special file ? (Yes/No) yes
Wiping /dev/sdb1, pass 0 in quick mode [ 3884 / 1026555392]
To know the detail of wipe command, we could see from the manual
root@hardy:/#man wipe
Subscribe to:
Comments (Atom)

