Spreadfirefox Affiliate Button
Custom Search

Saturday, February 28, 2009

Encrypted Private Directory in Ubuntu 8.10

One feature I’ve been looking forward to in Ubuntu 8.10 is the encrypted private directory. With this feature, you’ll get a folder called Private in your home. Private will work just like a normal folder, but it will be transparently encrypted and automatically locked and unlocked when you log in and out.

The encryption is provided by eCryptfs, a kernel-native cryptographic filesystem. I’ve written before on using it to create a private directory in Ubuntu 8.04.

At the moment, it seems that the private directory is not set up by default. There’s an option to do so in the alternate but not the graphical installer. I hope this is offered as an option in both installers, or even set up by default. Many users aren’t even going to know about this useful feature if it need to be set up in the terminal.

As of 8.10 alpha 6, set up the private directory for your user by running these commands:

sudo apt-get install ecryptfs-utils
ecryptfs-setup-private

After that last command, you’ll have to follow the prompts for your account password and then a mount password. Leave the mount password blank to generate a random one; you won’t need to use it unless you have to manually recover data.

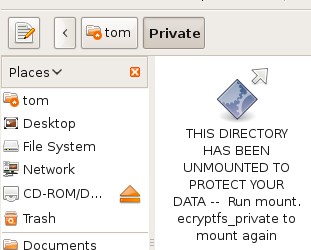
If you open the private directory now, you’ll see a file with a very long name telling you that the directory has been unmounted. Don’t worry about this, just log out and back in and the directory will be mounted properly.

unmounted directory warning

It would be nice if there were a nicer way to notify the user that the directory is unmounted than creating a file with a long name. There should really be an extra bar across the top with a label like Nautilus does with the trash. A little explanation that the folder is encrypted would be nice too.

[Source : http://tombuntu.com]

Wednesday, February 25, 2009

Howto:Recover your username and password/Fix Grub 21 Error in Ubuntu

Recovering Your forgotten username and password

If You just installed Ubuntu and forgot what password you selected during the installation process or one of your friend gave you ubuntu computer without giving username and password.This tutorial will help you to recover username and password

1) Turn on your computer, and as soon as you the Press Esc to enter grub message, press the escape key.

2) Select the option that says (recovery mode).

3) Your PC will boot into a shell. Once you get a command prompt, type “passwd username” where the username is your username. If you can’t remember your username, then you can type “ls /home” which should bring it up.

4) Enter a new password when prompted, and again when prompted again Type “shutdown -r now” to reboot your system,

That’s it. You should now be able to login with your new password.

Fix Grub 21 Error in Ubuntu

Problem

I’ve just tried installing Ubuntu but when it restert for the first time, GRUB returns an Error 21. I know this means that it can’t find the grub.conf file, but I don’t know how to fix this. I used Windows XP’s Recovery Console to get back into XP, but I can’t access the GRUB files.

Solution
1. Boot your computer up with Ubuntu CD

2. Open a terminal window or switch to a tty.

3. Go SuperUser (that is, type “sudo -s”). Enter root passwords as necessary.

4. Type “grub”

5. Type “find /boot/grub/stage1″. You’ll get a response like “(hd0,1)”.

Use whatever your computer spits out for the following lines.

6. Type “root (hd0,1)”, or whatever your hard disk + boot partition numbers are for Ubuntu.

7. Type “setup (hd0)”, to install GRUB to MBR, or “setup (hd0,1)” or whatever your hard disk + partition nr is, to install GRUB to a partition.

8. Quit grub by typing “quit”.

9. Reboot and remove the bootable CD.

Note:- In the above procedure hd0,1 is an example it might be different in your case.

Copyright by http://www.ubuntugeek.com


How to install anything in Ubuntu

Web site Cutler Software posts a detailed guide to installing any Linux app from the perspective of a new-to-Linux Windows user.

The guide starts with the basics of Synaptic (sort of the Add/Remove software tool for Linux), delves into installing apps from the command line, then finishes with steps necessary to manually install a package. When I installed Ubuntu in a triple-boot setup with Vista and XP, this straight-forward guide would have come in so handy. If you've made the move to Ubuntu - or you're considering making that leap - this guide is a must-bookmark.

Ubuntu 8.10 (Intrepid Ibex

his guide was started by Chua Wen Kiat (Kuala Lumpur, Malaysia) and is now maintained by the Linux Center of the University of Latvia.

Please help test and perfect this guide. To edit pages you need to register .

About Intrepid

  • On October 30, 2008 Ubuntu 8.10 was released.
  • It is code named Intrepid Ibex and is the successor to Ubuntu 8.04 LTS Hardy Heron (Hardy+1).
  • Intrepid Ibex is NOT an LTS (Long Term Support) release. It will be supported with security updates until April 2010.
More Detail

Monday, February 23, 2009

Gnome Partition Editor

GParted is the Gnome Partition Editor application. Before attempting to use it, here is some basic background information.

A hard disk is usually subdivided into one or more partitions. These partitions are normally not re-sizable (making one smaller and the adjacent one larger). The purpose of GParted is to allow the individual to take a hard disk and change the partition organization therein, while preserving the partition contents.

GParted is an industrial-strength package for creating, destroying, resizing, moving, checking and copying partitions, and the file systems on them. This is useful for creating space for new operating systems, reorganizing disk usage, copying data residing on hard disks and mirroring one partition with another (disk imaging). See Features, before using it.

GParted uses GNU libparted to detect and manipulate devices and partition tables.

Several (optional) file system tools provide support for file systems not included in libparted.
These optional packages will be detected at runtime and do not require a rebuild of GParted.

GParted is written in C++ and uses gtkmm for its Graphical User Interface (GUI). The general approach is to keep the Graphical User Interface as simple as possible. Every attempt was made to conform to the GNOME Human Interface Guidelines.

GParted comes under the terms of the General Public License

Download

The Ultimate Linux Network Reference Guide for Newbies

The previous article I wrote was The Ultimate Linux Network Reference Guide for Newbies and many of our readers seem to have liked it. We received many feedbacks on how useful it was specially for the users that are new to the Unix/Linux scene. For this reason, to further spread the knowledge, We’ve put together another guide called The Ultimate Linux Network Reference Guide for Newbies.

The reference should be an easy read and printer friendly. So if you’re just starting out on that Unix admin job or just trying to get around your own Linux install, this guide is for you. Unfortunately as with the first article, I was not able to fit this one into the blog template so I’ve created a separate html file. Please read full article here.

Friday, February 20, 2009

Connect to the Internet using SE P990i in Linux

I am using Linux at home (whenever possible). I can use P990i to connect to the Internet in Windows environment since this phone comes with driver/software for this OS. But what about in Linux? Here's how to do it...

Assumptions

This article assumes that GPRS/3G service is already activated in your SIM.
This article also assumes that you are familiar with Linux (esp. Debian Linux variants with GNOME desktop).

Requirements
SE P990i Unit (with SIM, indeed!)
DCU-60 Cable (bundled with P990i)
Linux (a Debian variant with GNOME Desktop)

Steps

  1. Install WvDial and GNOME PPP.
  2. Connect your phone.
  3. Configure connection.
  4. Connect.
Steps, explained...
Step 1
  • Install WvDial (if not yet installed)
-$ sudo apt-get install wvdial
  • Install GNOME PPP (if not yet installed)
-$ sudo apt-get install gnome-ppp

Step 2
  • Connect your P990i to PC (via DCU-60 cable).
  • When you connect your phone, 3 USB ACM (Abstract Control Model) devices should be registered (as shown below via "dmesg").

Step 3
  • Launch GNOME PPP.
  • Press "Setup".
  • Under "Modem" tab, click "Detect" button.
  • If it's not automatically detected (via "Detect") button, you can try putting the device manually (/dev/ttyACM1 in my case).
  • Click "Phone numbers..." button, then enter *99***1# in the first line, and "Close" it.
  • Click "Init strings..." button, then enter AT+CGDCONT=1,"IP","internet" in init 3, and "Close" it. This modem initialization strings are Smart Gold/Buddy specific. Replace "internet" with your provider's designated APN (i.e. internet.globe.com.ph (not sure) for Globe subscribers).
  • You might also want to set optional settings in the "Options" tab (as shown below).
  • "Quit" GNOME PPP.

Step 4
  • Launch GNOME PPP.
  • Enter anything in "Username" and "Password" (I used "test" for both).
  • Select the phone number or enter *99***1#.
  • Click "Connect".


When connected:


Thanks to http://bayanijuan.blogspot.com

Tuesday, February 17, 2009

Ubuntu Networking Configuration Using Command Line

The basics for any network based on *nix hosts is the Transport Control Protocol/ Internet Protocol (TCP/IP) combination of three protocols. This combination consists of the Internet Protocol (IP),Transport Control Protocol (TCP), and Universal Datagram Protocol (UDP).

By Default most of the users configure their network card during the installation of Ubuntu. You can however, use the ifconfig command at the shell prompt or Ubuntu’s graphical network configuration tools, such as network-admin, to edit your system’s network device information or to add or remove network devices on your system

Configure Network Interface Using Command-Line

You can configure a network interface from the command line using the networking utilities. You configure your network client hosts with the command line by using commands to change your current settings or by editing a number of system files.

Configuring DHCP address for your network card

If you want to configure DHCP address you need to edit the /etc/network/interfaces and you need to enter the following lines replace eth0 with your network interface card

sudo vi /etc/network/interfaces

# The primary network interface - use DHCP to find our address
auto eth0
iface eth0 inet dhcp

Configuring Static IP address for your network card

If you want to configure Static IP address you need to edit the /etc/network/interfaces and you need to enter the following lines replace eth0 with your network interface card

sudo vi /etc/network/interfaces

# The primary network interface
auto eth0
iface eth0 inet static
address 192.168.3.90
gateway 192.168.3.1
netmask 255.255.255.0
network 192.168.3.0
broadcast 192.168.3.255

After entering all the details you need to restart networking services using the following command

sudo /etc/init.d/networking restart

Setting up Second IP address or Virtual IP address in Ubuntu

If you are a server system administrator or normal user some time you need to assign a second ipaddress to your Ubuntu machine.For this you need to edit the /etc/network/interfaces file and you need to add the following syntax.Below one is the only example you need to chnage according to your ip address settings

sudo vi /etc/network/interfaces

auto eth0:1
iface eth0:1 inet static
address 192.168.1.60
netmask 255.255.255.0
network x.x.x.x
broadcast x.x.x.x
gateway x.x.x.x

You need to enter all the details like address,netmask,network,broadcast and gateways values after entering all the values save this file and you need to restart networking services in debian using the following command to take effect of our new ipaddress.

After entering all the details you need to restart networking services using the following command

sudo /etc/init.d/networking restart

Setting your ubuntu stytem hostname

Setting up your hostname upon a ubuntu installation is very straightforward. You can directly query, or set, the hostname with the hostname command.

As an user you can see your current hostname with

sudo /bin/hostname

Example

To set the hostname directly you can become root and run

sudo /bin/hostname newname

When your system boots it will automatically read the hostname from the file /etc/hostname

If you want to know more about how to setup host name check here

Setting up DNS

When it comes to DNS setup Ubuntu doesn’t differ from other distributions. You can add hostname and IP addresses to the file /etc/hosts for static lookups.

To cause your machine to consult with a particular server for name lookups you simply add their addresses to /etc/resolv.conf.

For example a machine which should perform lookups from the DNS server at IP address 192.168.3.2 would have a resolv.conf file looking like this

sudo vi /etc/resolv.conf

enter the following details

search test.com
nameserver 192.168.3.2

Taken from : http://www.ubuntugeek.com
Sunday, February 15, 2009

VirtualBox Host-Guest Interface Networking (Generic)

This way is a bit harder, but it allows you to see the VirtualMachine as a "real" computer on your local network.

1. Create a new bridge with this command:
# brctl addbr br0

2. If you are not using DHCP, run ifconfig and note down the network configuration of your existing network interface (e.g. eth0), which we will need to copy to the bridge in a minute.

(Note: You will need this settings so make sure you don't lose them!!!)

3. Switch your physical network adapter to "promiscuous" mode so that it will accept Ethernet frames for MAC addresses other than its own (replace eth0 with your network interface):

# ifconfig eth0 0.0.0.0 promisc

(Note: You will lose network connectivity on eth0 at this point.)

4. Add your network adapter to the bridge:

# brctl addif br0 eth0

5. Transfer the network configuration previously used with your physical ethernet adapter to the new bridge. If you are using DHCP, this should work:

# dhclient br0

Note:

Use "dhcpcd -t 30 -h yourhostname br0 &" instead of the above

Otherwise, run ifconfig br0 x.x.x.x netmask x.x.x.x and use the values that you noted down previously.

6. To create a permanent host interface called vbox0 (all host interfaces created in this way must be called vbox followed by a number) and add it to the network bridge created above, use the following command:

VBoxAddIF vbox0 vboxuser br0

Replace vboxuser with the name of the user who is supposed to be able to use the new interface.

(Note: VboxAddIF is located in /opt/VirtualBox-VERSION OF VIRTUALBOX/VBoxAddIF)

Alternatively, you can setup VirtualBox networking through your /etc/rc.conf to enable a bridged connection.

Saturday, February 14, 2009

XAMPP

Many people know from their own experience that it's not easy to install an Apache web server and it gets harder if you want to add MySQL, PHP and Perl. XAMPP is an easy to install Apache distribution containing MySQL, PHP and Perl. XAMPP is really very easy to install and to use - just download, extract and start.

At the moment there are four XAMPP versions:

* a version for Linux systems (tested for Ubuntu, SuSE, RedHat, Mandrake and Debian),
* a version for Windows 98, NT, 2000, 2003, XP and Vista,
* a beta version for Solaris SPARC (developed and tested under Solaris 8),
* and a beta version for Mac OS X.

Download

Installation

After downloading simply type in the following commands:

  1. Go to a Linux shell and login as the system administrator root:

    su

  2. Extract the downloaded archive file to /opt:

    tar xvfz xampp-linux-1.7.tar.gz -C /opt

    Warning: Please use only this command to install XAMPP. DON'T use any Microsoft Windows tools to extract the archive, it won't work.

    Warning 2: already installed XAMPP versions get overwritten by this command.

That's all. XAMPP is now installed below the /opt/lampp directory.

Start

To start XAMPP simply call this command:

/opt/lampp/lampp start

You should now see something like this on your screen:

Starting XAMPP 1.7...
LAMPP: Starting Apache...
LAMPP: Starting MySQL...
LAMPP started.

Ready. Apache and MySQL are running.

Test

OK, that was easy but how can you check that everything really works? Just type in the following URL at your favourite web browser:

http://localhost

Adopted from : http://www.apachefriends.org

Friday, February 13, 2009

WICD Network Manager

Wicd is an open source wired and wireless network manager for Linux which aims to provide a simple interface to connect to networks with a wide variety of settings.

Some of Wicd's features include:

  1. No Gnome dependencies (although it does require GTK), so it is easy to use in XFCE, Fluxbox, Openbox, Enlightenment, etc.
  2. Ability to connect to wired and wireless networks
  3. Profiles for each wireless network and wired network
  4. Many encryption schemes, some of which include WEP/WPA/WPA2
  5. Remains compatible with wireless-tools
  6. Tray icon showing network activity and signal strength

If you are using Ubuntu Jaunty (not currently released), Wicd is in the universe repository.

Installing Wicd in Ubuntu is very simple. You just have to add the Wicd repository to the Ubuntu package manager. To open the package manager in Gnome, go to Administration > Synaptic Package Manager. When it appears, go to Settings > Repositories > Third Party Software > Add..., and enter the following line:

deb http://apt.wicd.net hardy extras
where gutsy is your version of Ubuntu in lowercase (dapper, edgy, feisty, gutsy, hardy, intrepid). You'll also need to add the key used for signing Wicd by running the following command in a terminal:
wget -q http://apt.wicd.net/wicd.gpg -O- | sudo apt-key add -
Now, click Reload, and wait while the package lists are downloaded. Now, search for "Wicd", and right click on it. Select Install, then press Apply, and Wicd will automatically be downloaded and installed for you. This will also keep you automatically up to date with the latest and greatest version of Wicd. Please note that this will remove network-manager, which is the default GNOME network manager and may cause loss of network connection temporarily.

TROUBLESHOOTING

If Wicd fails to connect after you install it, make sure that the only entry in your /etc/network/interfaces file is
auto lo
iface lo inet loopback
You can change the contents of this file by pressing alt + f2, then typing
gksudo gedit /etc/network/interfaces
if you are using Gnome, or replace gedit with kate if you are using KDE. This will allow you to view and edit the /etc/network/interfaces.You can ignore lines that start with #.

STARTTING WICD

If you are using a desktop environment without a notification area, you can run the Wicd GUI by running

wicd-client -n
If you are using a desktop environment with a notification area, you can start the tray icon by running
wicd-client
If you are using a desktop environment such as GNOME or KDE, you can start the Wicd GUI by opening the Application

Thursday, February 12, 2009

SHOWING SPLASH PICTURE AT GRUB

Originally, Grub menu only a text with dark background. I want to change it in order my menu is good looking with a picture, not just text.

We called this display is "splash" and the picture which used is called "splash picture".

This is a "howto" add and show splash picture.

1. Download and install splash picture
$ sudo apt-get install grub-splashimages
$ sudo aptitude install grub-splashimages
$ sudo dpkg -i grub-splashimages_1.2.3_all.deb
2. If installation is successful, it will create a directory under /boot/grub/splashimages which is consisted with picture in .xpm.gz ekstention
3. Edit menu.lst and add a command
splashimage=/boot/grub/splashimages/biosplash.xpm.gz
And give "#" at command hiddenmenu
4. Restart and we could see our grub menu which have been modified

If we want created picture, we could used gimp or etc which size is 640x480 pixel and colour is 16

Monday, February 2, 2009

VirtualBox Error Due To Kernel Upgrade

I am using Ubuntu 8.10 and running virtualbox smoothly. But after I upgrade kernel from 2.6.27-7 to 2.6.27-9 vbox have an error when started. The error like this :


I follow the fix that suggested at message pop up like this :


Gotcha, my virtualbox running properly again